Syncing your Outlook calendar and tasks with ClickUp can help you streamline your workflow and ensure efficient coordination between platforms. ClickUp offers two methods to sync Outlook: syncing Outlook events to ClickUp Calendar views or syncing tasks from ClickUp to Outlook. In this step-by-step guide, we will walk you through the process of setting up the integration and achieving a synchronized workflow. Let’s explore the steps involved in syncing Outlook with ClickUp.
Step 1: Start with a New Outlook Calendar
To begin, ensure you have access to a brand new Outlook calendar. This will help simplify the setup process and ensure a smooth integration.
Step 2: Access Calendar View in ClickUp

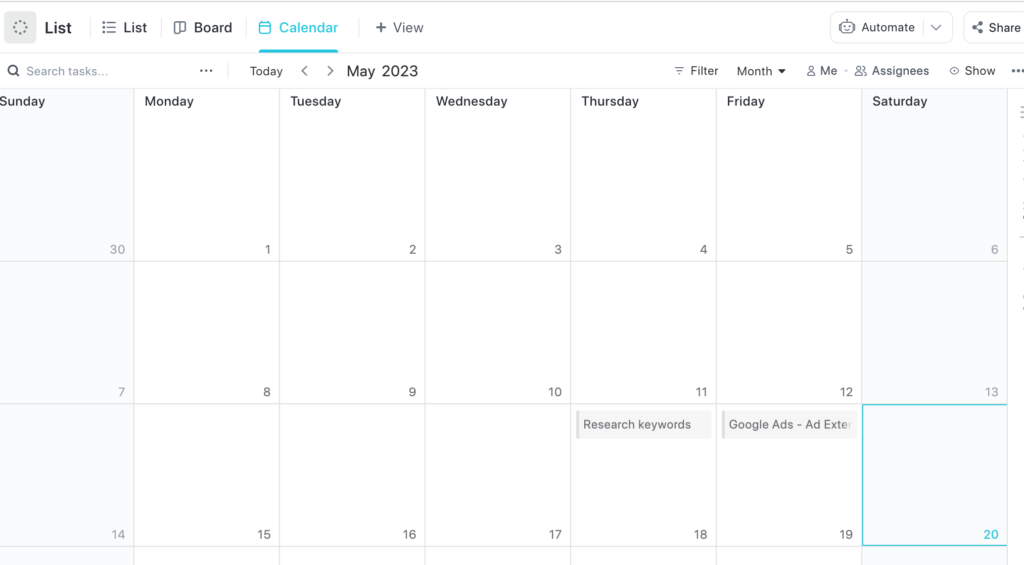
- Log in to your ClickUp account and navigate to the Calendar view.
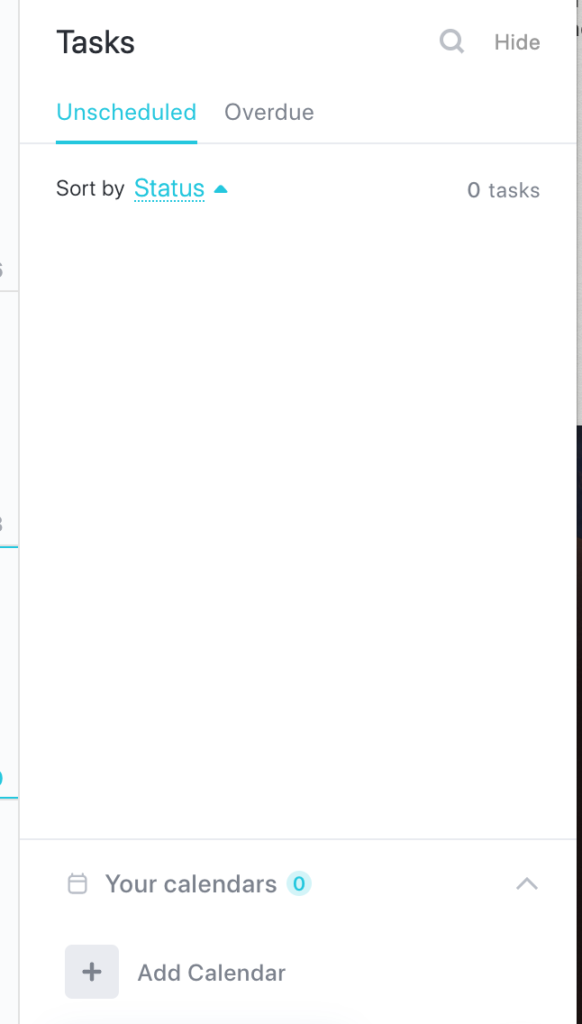
- On the right sidebar, you’ll find a count for overdue or unscheduled tasks. Click the three lines to open the “Tasks” sidebar, which displays unscheduled and overdue tasks.
Step 3: Add Outlook Calendar

- At the bottom of the sidebar window, click on “+ Add Calendar.”
- Select “Google Calendar” from the options provided.
Step 4: Authenticate Your Outlook Account
- A page titled “Calendar” will appear, offering options for Outlook and other platforms.
- Click the “+ Add Account” button to initiate the process of adding your Outlook calendar.
- Follow the instructions and authenticate your Outlook account when prompted. Note that you may need to re-authenticate your account based on security policies.
Step 5: Choose Sync Type
- In the “Add Outlook” window, you will have two options: sync events to ClickUp or sync tasks to Outlook.
- To sync events to ClickUp, choose the calendars you want to see within ClickUp and overlay the events in any Calendar view. Changes made in ClickUp will be synced back to Outlook.
- To sync tasks to Outlook, you can view your ClickUp tasks inside Outlook, creating a real-time two-way sync. Moving tasks in Outlook will sync those changes to ClickUp.
Step 6: Select Outlook Account and Calendar

- Click “Next” to proceed.
- Choose the Outlook account associated with the calendar you want to sync.
- From the list of calendars linked to the chosen account, select the desired calendar.
Step 7: Connect Outlook to ClickUp (Optional)

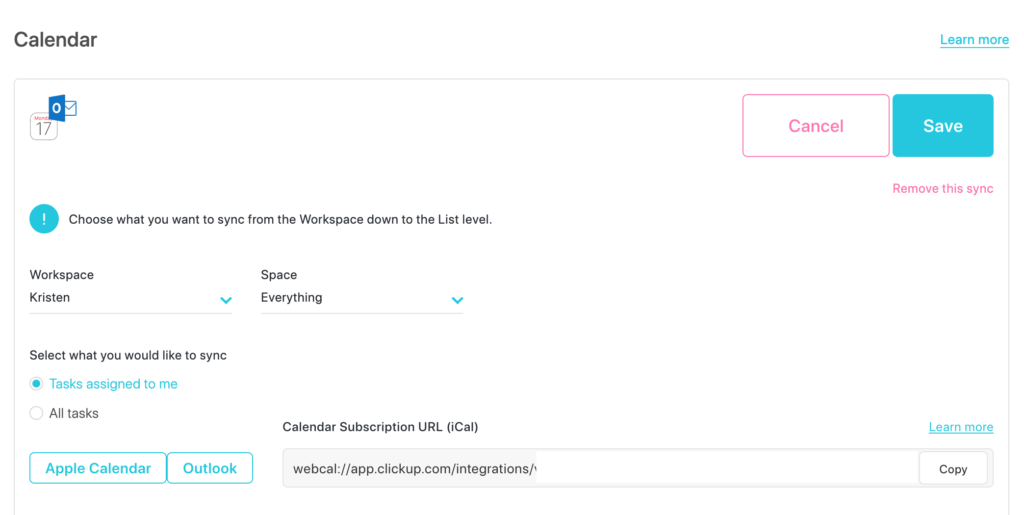
- On the Calendar page in ClickUp, locate the section mentioning “Apple Calendar, Outlook.”
- Click the “Connect” button.
- Choose the workspace and the entire space name you want to sync.
- Select whether you want to sync tasks assigned to you or all tasks.
- Click “Save.”
- You will be presented with two options: “Apple” or “Outlook,” along with an iCal link to copy.
Step 8: Verify and Save Sync Setup
- Click “Next” to proceed.
- If the setup process was successful, you should see a confirmation message.
- It may take a few minutes for the calendar to sync and for your events or tasks to appear.
Step 9: View Synced Calendar and Tasks
- Return to the main calendar page in ClickUp.
- You will see the connected Outlook calendar and an indication of what is being synced.
Step 10: Ensure Connectivity with Outlook Account
Make sure you are connected to your Outlook account to complete the sync process successfully.
Syncing your Outlook calendar and tasks with ClickUp empowers you to seamlessly manage your workflow and enhance productivity. By following the step-by-step guide provided above, you can easily set up the integration between Outlook and ClickUp. Whether you choose to sync Outlook events to ClickUp Calendar views or sync tasks from ClickUp to Outlook, you’ll enjoy a synchronized system that keeps you organized and up-to-date.
Starting with a new Outlook account and accessing the Calendar view in ClickUp, you can add your Outlook calendar and authenticate your account. The integration works on ClickUp’s browser or desktop app, and while it is compatible with the ClickUp mobile app, it’s essential to set it up initially on a desktop or browser.
Once the sync is established, you can choose which calendars or tasks to sync between Outlook and ClickUp, ensuring flexibility and customization according to your preferences. Any changes made in ClickUp will be seamlessly reflected in Outlook, and vice versa, enabling a real-time two-way sync.
Take a few moments for the calendar to sync, and then navigate back to the main calendar page in ClickUp to see the connected Outlook calendar and the synced events or tasks. Optionally, you can connect Outlook to ClickUp further by following the additional steps provided in the guide.
With Outlook and ClickUp in sync, you can effortlessly manage your appointments, deadlines, and tasks, leading to improved organization and productivity. Embrace the power of integration and enjoy a seamless workflow that aligns your Outlook calendar with your ClickUp tasks.
Remember to ensure connectivity to your Outlook account to finalize the sync process successfully. Embrace the benefits of a synchronized system, and leverage the combined functionalities of Outlook and ClickUp to optimize your productivity and achieve your goals efficiently.
More On ClickUp
How to Add an Attachment in Clickup Tasks?
Task Management Showdown: ClickUp vs Todoist – Which One Wins?
Related
How to Sync Google Calendar with ClickUp
The Power of Dashboards: How to Set Up a Dashboard on ClickUp
Pingback: Can You Access ClickUp 3.0 as a Non-User? - Digital Marketing CEO
Pingback: ClickUp 3.0: Redefining Productivity with an Array of Exciting Updates - Digital Marketing CEO
Comments are closed.