In today’s fast-paced world, effective task management and project organization is crucial for success. ClickUp, a leading project management tool, offers a robust feature called “Dashboards” that enables users to create visually appealing and insightful representations of their tasks and data. In this article, we will explore the importance of setting up a dashboard on ClickUp and how it can revolutionize your project management approach.
Creating a dashboard in ClickUp is a great way to organize and visualize your tasks and project data. Follow these steps to create a dashboard that suits your needs:
- Open ClickUp: Log in to your ClickUp account and navigate to the main dashboard.
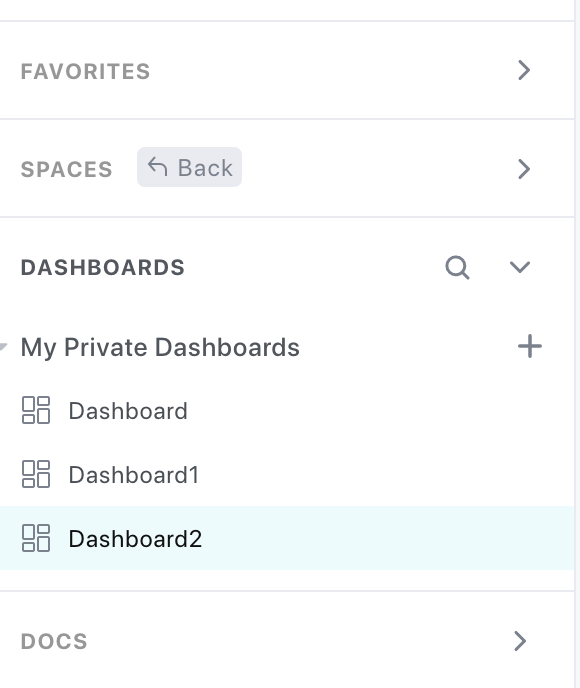
2. Access Dashboards: On the left sidebar, locate the “Dashboards” section. Under this section, you will find “My Private Dashboards.” Click on the “+” icon next to “My Private Dashboards.”
3. Create a New Dashboard: A window titled “Create a Dashboard” will appear. Here, you have the option to choose from three different templates: “Simple Dashboard,” “Reporting Dashboard,” or “Time Tracking Dashboard.”
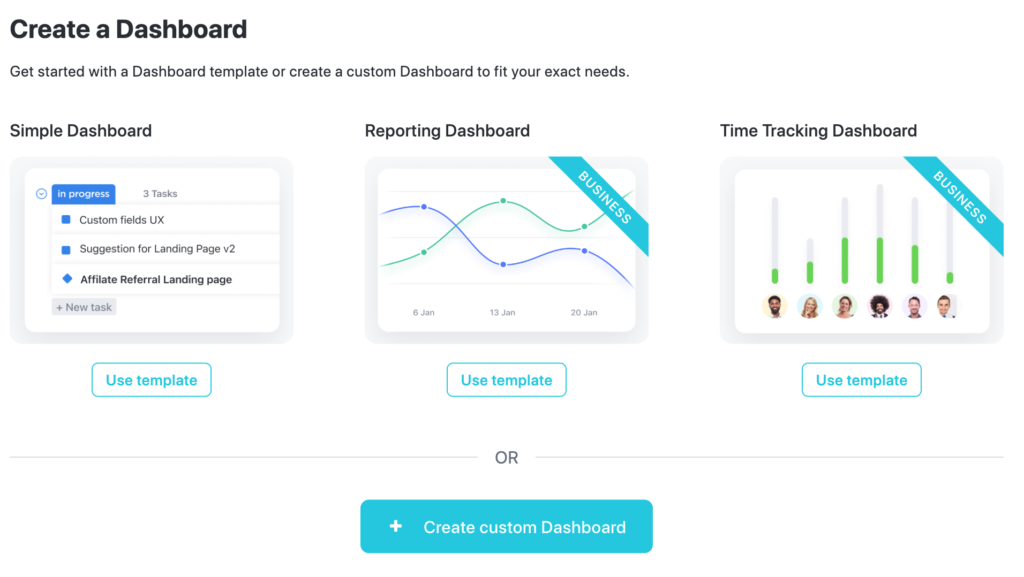
4. Template Selection and Setup: If you choose one of the provided templates, ClickUp will guide you through a setup process. This will involve specifying where you want the dashboard to be placed.

5. Default Template Cards: Once you have selected a template, you will see several default cards on your dashboard. These may include a “Welcome to ClickUp Dashboards” card with an introductory message that you can edit. Additionally, there may be cards for chat, docs, files & links, and a task list.
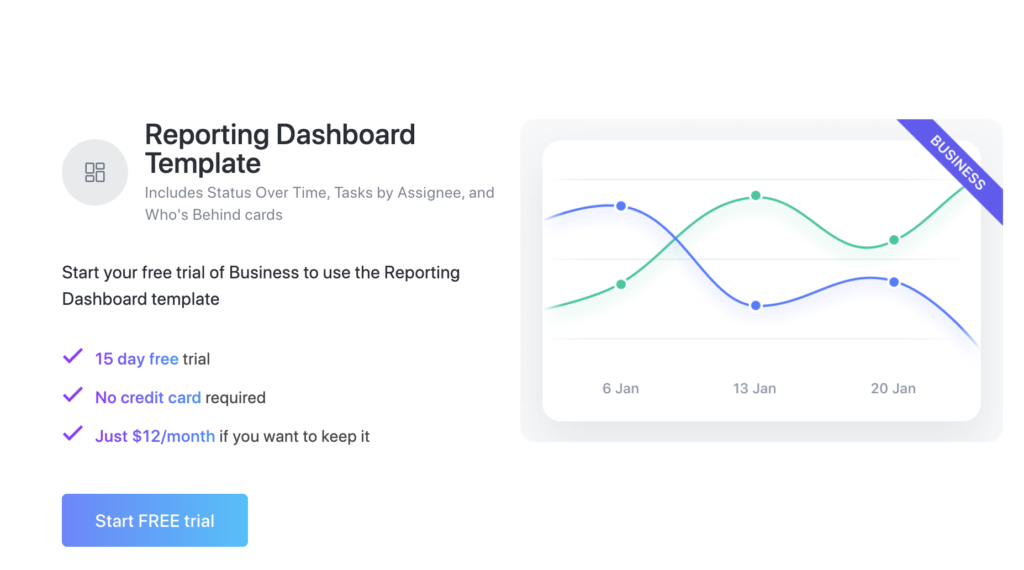
5. Reporting Dashboard Template (Optional): If you opt for the “Reporting Dashboard” template, please note that it requires a subscription of $12 per month to maintain access. However, there is a 15-day free trial available. This template offers features such as status over time, tasks by assignee, and who’s behind cards.
6. Time Tracking Dashboard Template (Optional): Similarly, if you choose the “Time Tracking Dashboard” template, it also comes with a cost of $12 per month but includes a 15-day free trial. This business-oriented template provides features like time reporting, timesheets, and workspace points cards.

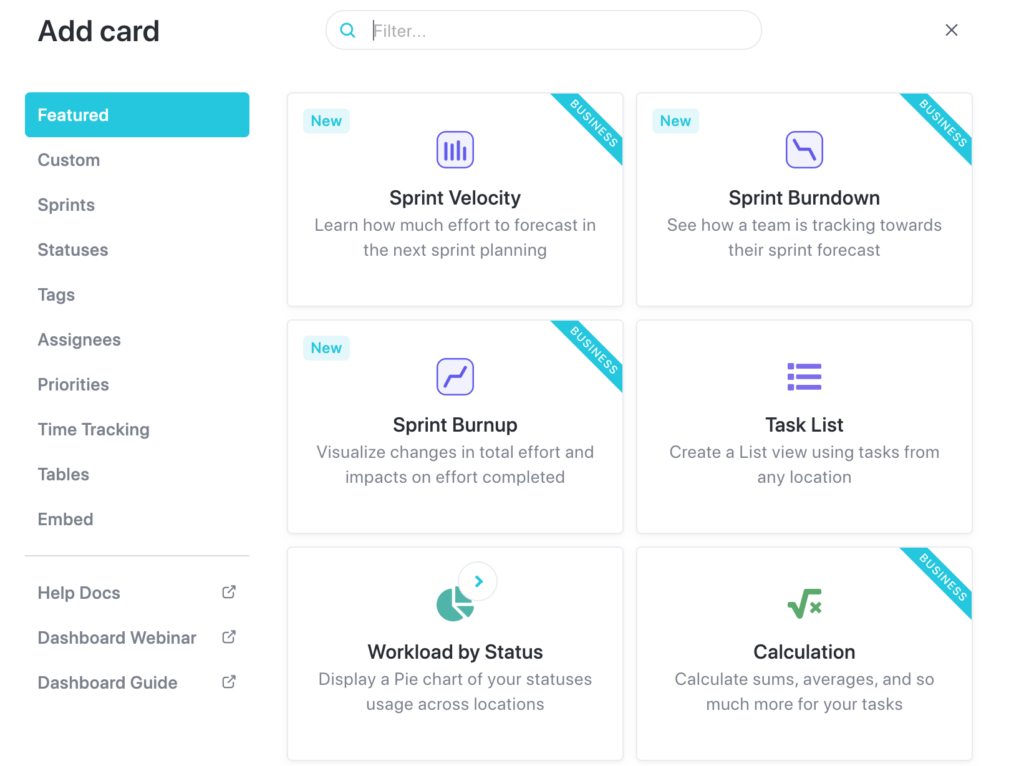
7. Custom Dashboard: Alternatively, you can create a custom dashboard from scratch. ClickUp offers a variety of cards that you can choose from, including sprint velocity, sprint burndown, sprint burn, task list, workload by status, calculation, time reporting, portfolio, tasks by assignee, text block, and chat. Select the cards that best suit your requirements and add them to your custom dashboard.
By following these steps, you can easily create a dashboard in ClickUp that aligns with your project management and tracking needs. Dashboards provide a visual overview of your tasks and progress, helping you stay organized and efficient.
- Visualize Your Progress:
Dashboards on ClickUp allow you to visualize your progress in a clear and concise manner. With customizable cards and templates, you can represent your tasks, deadlines, and milestones in a visually appealing way. This visual representation provides an instant overview of your project’s status, enabling you to quickly identify bottlenecks, track progress, and make informed decisions. - Stay Organized:
A well-designed dashboard helps you stay organized by bringing all relevant project information into one central location. You can incorporate task lists, documents, chat, and important links, streamlining your workflow and reducing the time spent searching for scattered information. By having everything readily accessible, you can improve productivity and focus on accomplishing tasks more efficiently. - Real-Time Collaboration:
Dashboards in ClickUp foster real-time collaboration among team members. With shared dashboards, team members can access and contribute to project updates, discussions, and files. This promotes transparency, encourages collaboration, and keeps everyone on the same page. Whether you’re working with a remote team or in a co-located setting, ClickUp dashboards provide a centralized hub for seamless collaboration. - Data-Driven Decision Making:
ClickUp dashboards offer powerful reporting and analytics features that empower you to make data-driven decisions. Reporting templates such as the Reporting Dashboard provide insights into task progress, workload distribution, and individual performance. These analytics can help you identify patterns, track key metrics, and optimize your project management strategies. By leveraging these data-driven insights, you can continuously improve your workflow and achieve better outcomes. - Customization for Your Needs:
One of the significant advantages of ClickUp dashboards is the ability to customize them to suit your specific requirements. Whether you choose pre-designed templates or create a custom dashboard, you have the flexibility to select and arrange cards based on your project’s unique needs. This customization empowers you to focus on the most critical aspects of your project, ensuring that you have the right information at your fingertips. - Enhanced Accountability:
Dashboards promote accountability by providing a visual representation of individual and team responsibilities. With task tracking cards, you can easily monitor progress, identify overdue tasks, and hold team members accountable. This transparency encourages timely completion of tasks, reduces delays, and fosters a culture of ownership within your team.
Setting up a dashboard on ClickUp is not only important but also beneficial for effective project management. It offers a holistic view of your tasks, enhances collaboration, and provides valuable insights for decision making. By utilizing ClickUp’s dashboard feature, you can streamline your workflow, improve productivity, and achieve greater success in your projects. Embrace the power of dashboards and unlock the full potential of your project management efforts on ClickUp.
Related
Why Do You Need Spaces on Clickup
How to Set Up a Space in ClickUp: A Step-by-Step Guide
Clickup Task vs. Folder vs. List